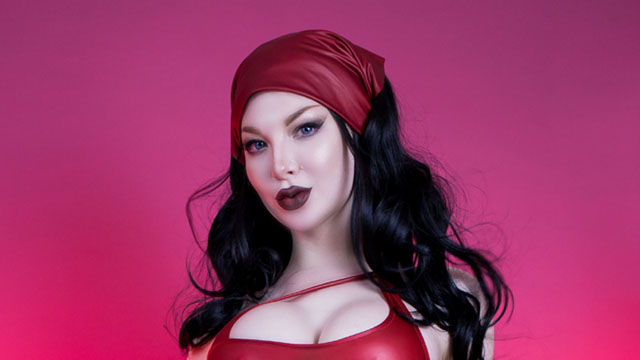
Note From the Editor: This week, Superhero Hype’s special guest cosplay correspondent is Ashlynne Dae, the woman who launched our cosplay coverage last summer. Ashlynne’s subject for this column is Marvel’s Elektra Natchios, the assassin who memorably made her debut during Frank Miller’s legendary Daredevil run. While Elektra has previously appeared in live-action for Fox and for Marvel TV on Netflix, Ashlynne’s take on the character is clearly more inspired by Elektra’s comic book look.
Hello lovely humans! This week, I’m going to be going through how I made my Elektra cosplay.
I hope you enjoyed this little walk through. This was a fun project to tackle. And even though it wasn’t smooth sailing the entire way, I ended up really liking the results.
You can get this full set on my website!
Patreon: patreon.com/ashlynnedae
Official Site: ashlynnedae.com
Instagram: @ashlynnedae
Twitter: @ashlynne_dae
Premium Only Fans: onlyfans.com/ashlynnedae
Free Only Fans: onlyfans.com/ashlynnedaefree
Superhero Hype Cosplay: Elektra
Superhero Hype Cosplay: Elektra #1
For this cosplay, I used my favorite coated spandex in red and oxblood, there is just a tiny difference in the tones so the darker oxblood was great for adding some definition to the all red outfit, and I used a very fine mesh for the skirt front and back.
Superhero Hype Cosplay: Elektra #2
First up, I had to make my pattern. I used my high cut leotard block as usual to trace the initial pattern so I could make my design changes.
Superhero Hype Cosplay: Elektra #3
Because this is an asymmetrical style, I had to trace the pattern “open” as we would call it, as normally the pattern is cut on the fold. But because the two sides of the front and back aren’t symmetrical, we have to treat it differently than usual.
Then I fiddled about with my initial design for a while on this, so I ended up making changes to the pattern later.
I drew out on my pattern which side I wanted my shoulder strap to sit, remembering to mirror it, because once it is on the body it will be on the opposite side. And then I drew in my new armscye shape and scooped asymmetrical neckline.
Superhero Hype Cosplay: Elektra #4
I repeated this step on the back, making sure that the side seams for both sides were still the same length and the shoulder strap as well.
Once that was cut, I cut out what felt like a million, but was really only 10, strips of both colors varying in widths from 2 inches to 4 inches and the entire fabric length for her wraps.
The skirt pieces were just rectangles about 12 inches wide and as long as the fabric. I cut that in half widthwise to get two skirts out of it. The waistband for the skirts I had already made from another costume, that piece was also just a wide rectangle, 22 inches long and 14 inches wide.
Once I had all my initial pieces cut out, I started in on the sewing.
Superhero Hype Cosplay: Elektra #5
Sewing this up was pretty straight forward. Starting on the leotard, I stitched both side seams together, then the crotch and the shoulder. I tried this on and made several changes to the design, including lowering the armhole, scooping out the neckline more and adding an additional strap piece from the side without the shoulder strap for some additional support.
I was going back and forth between having a keyhole and not, so both options were drafted into the pattern, but the extra piece helped the whole thing fit better.
After the leotard was sewn up, I hemmed all the leg holes and neckline and armscye with elastic and topstitched my little addition piece on simultaneously.
Superhero Hype Cosplay: Elektra #6
As I mentioned before the waistband for my skirt was already made, stolen from another cosplay, DOA ’s Kasumi in her black outfit. But that was constructed the same way the arm loops below were, just wider.
On the inside of that are four pieces of Velcro to attach a skirt, so for Elektra’s skirt, I simply gathered the top edge, stitched it to some red grosgrain ribbon and stitched on some Velcro where they aligned on the waist band. Then all that was left was to sew all the wraps.
Superhero Hype Cosplay: Elektra #7
For her wraps, I knew I was going to want to “line” them for a clean effect. Because this fabric is not coated on both sides, it is very obvious which side is right and wrong, so just cutting simple strips and tying them on me wouldn’t have worked the way I wanted it to, because you would be able to see the wrong side in some places.
So to prevent this, all of the strips I cut were cut double the desired width plus seam allowance to allow me to stitch them together.
Superhero Hype Cosplay: Elektra #8
I stitched them all right sides together, leaving the ends open as I could cleanly cut the ends on the “flowing” pieces.
For the upper arm wraps, however, I stitched the ends of them together to form a loop so I wouldn’t have to tie them on. If you’ve read my Psylocke article , I talk about this here in more detail.
Have you ever tried tying something on your own upper arm one handed? It's not easy, so this eliminated that problem quite effectively by allowing me to loop them around my arm and twisting them as needed to adjust without having to fiddle with any knots.
Once all my wraps were sewn, I set up my shoot.
Superhero Hype Cosplay: Elektra #9
And then realized I completely forgot about the head scarf and armlets!
Had I remembered before I was already in makeup, wig, and costume, I would have finished these more cleanly. But since I was on a time crunch to wrap this up, I cut some simple shapes and made it work.
Superhero Hype Cosplay: Elektra #10
It really reminded me of the days when we used to be able to go to conventions and had to make last minute costume pieces before we walked out the door.
Superhero Hype Cosplay: Elektra #11
My headscarf was a simple triangle with long strips connecting to the bottom for the ties. My armlets were just the bottom portion of a sleeve pattern I had.
When I get the chance to wear this again, I’ll go back in and hem these pieces, but I think it's hardly noticeable now.
Superhero Hype Cosplay: Elektra #12
Once I had tied all my wraps on, I simply pulled the extras through so they looked like really long ends.
The long trailing extra bits of her wraps are my favorite part of her costume so I wanted to make sure I had some good long ones in mine. Totally not a necessary step. but I thought it was fun!