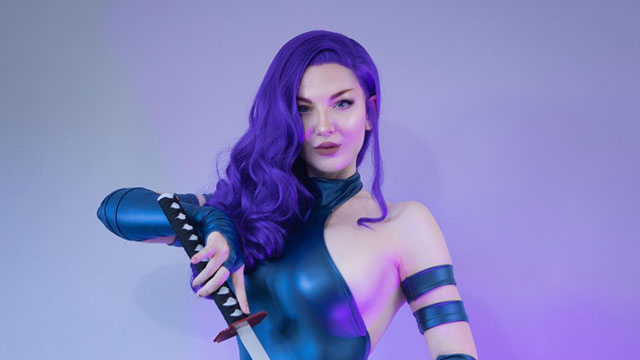
Note From the Editor: As part of Superhero Hype’s newly launched cosplay coverage, our special corespondent, Ashlynne Dae, is back with a new column. In this installment, Ashlynne is sharing the steps she took to recreate Jim Lee’s iconic Psylocke costume from his legendary run on Uncanny X-Men.
RELATED: Superhero Hype Cosplay: Creating Psylocke Part 2
Next time, we will pickup from…
Creating Psylocke Cosplay Part 1
-
Psylocke

Hello fabulous humans! I hope the world is treating you well! Since I just finished making this costume, I thought I would walk you all through how I made my new Psylocke cosplay!
-
The One and Only

While I recognize this particular part of her story is wildly problematic, this is the costume I have always associated with the character Psylocke. So I really couldn’t see myself making any other version.
It was pretty simple to make for me, and in these times, having smaller costume goals that are more easily achievable than massive in depth armour builds really helps you feel that sense of completion more quickly than an ongoing project would. And I’m all about that satisfaction hit right now to keep morale up!
I will explain a bit about how I made my cosplay using my own self-drafted pattern blocks, which if you have any, you can apply these techniques to create your own pattern for similar costumes!
If you don’t, I will explain a bit about pattern blocks and how you can get or make your own!
-
Inspiration

We all know and love our dear Betsy Braddock aka Psylocke. Or Kwannon in the current Dawn of X comics. She's a female mutant who has been featured in many X-Men comics over the years.
While she isn’t my favourite mutant with psychic powers, (that spot is reserved for Jean Grey), she is pretty freaking cool.
-
Psylocke Sketch 1

Psylocke is often famously depicted wielding a psychic blade and rocking a blue leotard and matching thigh high boots and gloves, usually with some cheeky cut-outs!
She also sports a red sash, sometimes with an accompanying X-buckle and sometimes without.
-
Psylocke Sketch 2

Due to lack of appropriate materials on hand caused by COVID-19 closures and shipping delays, I decided against adding the X-symbol belt buckle. But I hope to add it to the costume in the future!
I decided for my own sanity not to stress myself out about such a small detail, because cosplay is supposed to be fun after all!
-
Pattern Blocks

I chose to use a matte metallic blue stretch fabric I had gotten from the LA fabric district once upon a time when such trips were allowed. It is 4 way stretch, meaning it’s appropriate for a bodysuit made in this way because it stretches both width wise and length wise.
This is extremely important, and any fabric that is 2 way stretch only would have to be handled differently. And a completely non-stretch wouldn’t be appropriate for this application. I know that for some, sewing stretch fabrics can be daunting. But I promise it’s a breeze when you get the hang of it!
-
Tracing Pattern Blocks on Paper

First up, I had to make my pattern! I used my handy dandy marker paper that has a 1” grid through it, this helps to make sure grainlines are straight and easy to keep track of adding length to pieces without a ruler!
Any paper can be used, however, if you don’t have this on hand. But I highly recommend it if you are serious about drafting your own patterns! I have pre-drafted pattern blocks I have created for myself that I used to get the style lines I wanted for this costume.
-
Front Design Line Changes

Blocks are basic patterns that can be manipulated and changed to get the desired final pattern styles. You have the benefit of knowing they already fit whatever standard measurements you use. So I highly recommend if you have a pattern that fits you well in a style you use often, you convert that to a block!
This is easily done by tracing that pattern onto some oaktag, poster board or cardboard. Anything that will stand up to repeated handling that would make tracing easy. If you don’t have a block for a certain style you can make one by drafting them using tutorials online, or getting your hands on a pre-made one and fitting it to your body.
Once you have that fitted, transfer any changes to the original and follow the steps above and you’ll have your block!
-
Front and Back Finished Pattern - It's OK To Be Indecisive

Knit blocks don’t typically need darts, so it’s even easier to sew up! I laid my block on the straight of grain and traced the outline onto pattern paper as a base. From there I was able to draw whatever changes I wanted around the neckline and the hemlines!
If you aren’t sure exactly where you want the lines to go, you can make a mock-up and draw them while it’s on your body! I’ll cover that method in a later post, however.
If you aren’t careful, you can end up removing too much, so just be careful with your placement! Knit fabric is pretty forgiving, so I wouldn’t recommend doing this with wovens unless you have a bit of experience.
-
Finished Patterns

Once you get your pattern looking the way you like it, make sure you trim all the seam lines to ensure they match up, add your seam allowance since your block shouldn’t have any, and cut it out!
Don’t forget to mark your grainlines and any important notches!


