Note From the Editor: As part of Superhero Hype’s cosplay coverage, our special corespondent, Ashlynne Dae, is back with a new column. This is the second and final installment of her Creating Psylocke series. Last week, Ashlynne walked us through the early stages of how she recreated Jim Lee’s fan favorite Psylocke costume from Uncanny X-Men. Now, Ashlynne is showing us her last steps and sharing a few of her in-costume pictures!
Hello all you fabulous humans! Last week, I covered how to go about making a pattern for Psylocke’s bodysuit using a pattern block. This week. I’ll go into a bit of the construction process for the suit, boots, and gloves! This is more of a rough overview of my sewing process. If you are new to cosplay and sewing, I may have a more in depth explanation of these processes in the future! However, if you have any questions please do feel free to contact me! I’ll do my best to help! Now, let’s get to it!
RELATED: Introducing Superhero Hype Cosplay With Ashlynne Dae!
Instagram: @ashlynnedae
Twitter: @ashlynne_dae
Facebook: Ashlynne Dae
Patreon: patreon.com/ashlynnedae
Only Fans: onlyfans.com/ashlynnedae
Official Site: ashlynnedae.com
Twitch: ashlynne_dae
Creating Psylocke Cosplay Part 2
-
Laying Out the Patterns on Fabric

Our next step is to cut out your pattern out of your fabric. Make sure the part of the pattern that will wrap around the body horizontally is placed on the greatest degree of stretch.
This is usually the crossgrain but each fabric is different. Make sure you check by pulling your fabric both ways! My pieces included the front and back of the leotard, the neckband, the boot covers, the gloves, and all the straps for the arms and legs.
Once you get everything cut out, it’s time to head to the sewing machine!
-
Test Fitting #1

Now I use a serger for most knit projects, but if you don’t have one there are a couple stitches on standard sewing machines that are perfectly fine as well! You can use a straight stretch stitch, which looks like a sort of lightning bolt shape, or a zig zag stitch.
You don’t want to use a standard straight stitch because the thread will pop once the fabric stretches over the body. Most knits won’t fray so it’s okay to have a raw edge on the inside of you don’t have a serger.
-
Test Fitting #2

Sew your front and back together at the side seams, shoulders and rise. Sew your boot covers together as well as your gloves. I don’t have a zipper for this suit because the back is low, but if you have one in your design insert it before sewing the fronts and backs together.
Give it a try on before you sew the elastic in, conduct any fitting necessary and make any changes to edges if desired.
-
Sewing on Elastic

Once that’s done you can serge or zigzag clear elastic on the wrong side of the fabric. Don’t pull tight but keep it taut as you sew it in. The goal is to not have any puckers or wrinkles but you want to give the hem some stability and it helps the armholes and legholes to fit to the body better.
After that, turn the hem up and stitch with a straight stretch stitch to close the elastic in! I did this on all hems for all the pieces of this costume.
-
Hemming the Edges

Next step is to add your neckband. Because this pattern is extremely cut away I wanted to face my neckband.
I did this by finding the middle of my rectangular piece of fabric cut for my neckband (it was 13 x 4 inches. but cut yours accordingly) and the middle of my bodysuit’s neckline, marking where the opening should be and sewing the rest closed, including the short sides.
-
Neckband

I then stitched the top of the neckband right sides together to my bodysuit, and then whip stitch the band closed in the back.
-
Strap Topstitching

Then all that’s left is to sew the straps! I cut them 2x wider than I wanted the finished strap to be, and the length is the measurements of your upper arms and legs -1” for stretch.
Sew them in half right sides together length wise leaving the ends open, turn them inside out and stitch the open ends together. You can either insert one side into the other and topstitch them closed, or simply stitch the two sides together.
-
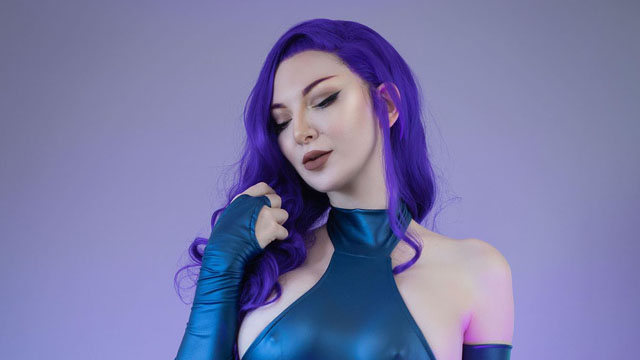
Psylocke Revealed

Once that’s all done, cut a quick long skinny rectangle out of some red knit fabric and boom! It’s time for a photoshoot!
I used a purple lace front I had stored in one of my many wig boxes (I have a lot of wigs) and gave it a deep part.
-
"The Focused Totality of My Telepathic Powers"

I shot this set myself in my home studio using seamless background paper, steady lights with soft boxes and a coloured LED light for the colour effects!
I added some purple psychic powers in photoshop for some of the pictures for a little zazz! All in all it took me about a day to make and shoot this costume!
-
She Knows What You're Thinking

I’m featuring X-Men ladies on my Patreon this month, and absolutely had to make sure I included Psylocke! I can finally cross her off my list after years of planning for her! I hope you have found my write up useful or entertaining!
If you have any questions or need any help with this costume feel free to contact me!


